
The DITO SIM registration process is crucial for both new and existing users, ensuring the security of your personal information and keeping your SIM card active. By registering, users can enjoy uninterrupted access to DITO’s fast data services, high-quality calls, and other features.
To make this process easy, DITO provides a simple SIM registration link on their official website. With just a few steps, users can input their personal details and submit the registration form quickly. The DITO SIM registration link for 2024 is designed to be user-friendly, allowing even those new to SIM registration to complete the process effortlessly.
Methods of DITO SIM Registration
DITO SIM registration has three methods for customers to register their SIM cards: through the app, via SMS, and through the official web portal. You can choose any of these methods to register your SIM.
DITO SIM Registration via App
Registering your DITO SIM through the app is straightforward. Here’s how to do it:
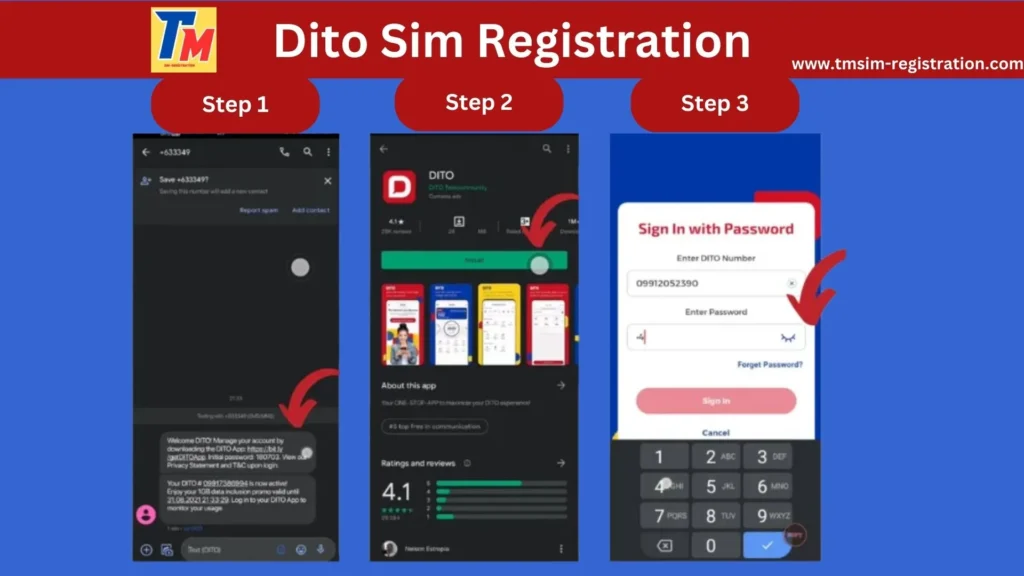
- Get the DITO app from the Google Play Store.
- Open the app and log in with your secure password and username.
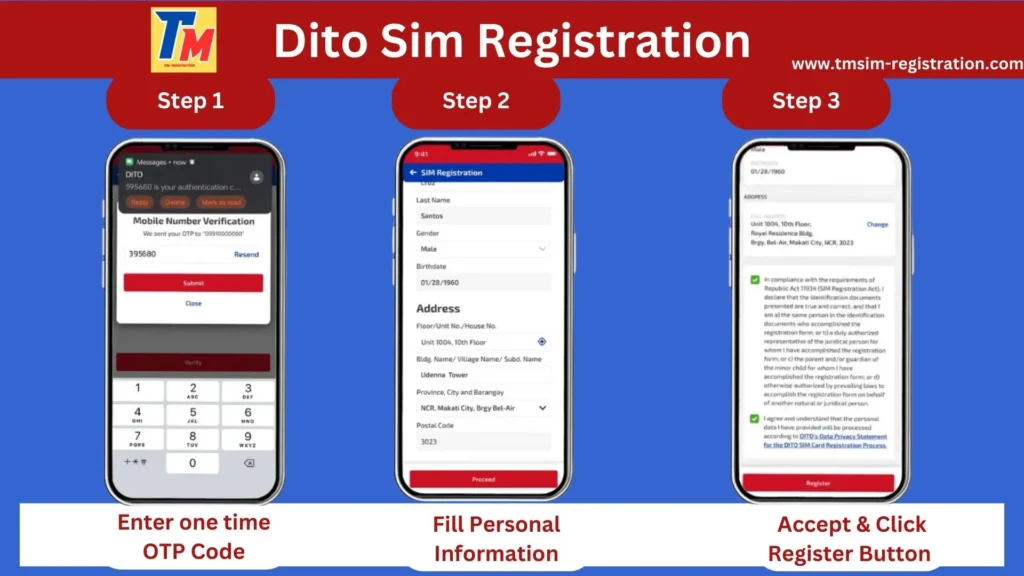
- Click on the “Registration” option in your dashboard.
- Enter your DITO SIM registration number.

- You will receive an OTP (One-Time Password); enter it and press the verify button.
- Enter your personal details, including your name, address, and date of birth.
- Provide a valid government ID (Passport, National ID).
- Upload a clear picture of your ID card.
- Take and upload a clear selfie.
- Review all the details and click the submit option.
- You will receive a confirmation message that your DITO SIM is successfully registered.
DITO SIM Registration via SMS
You can also register your DITO SIM card using the SMS method by following these steps:
- Insert Your DITO SIM Card: Place your DITO SIM card into your mobile device.
- Open Your Messaging App: Launch the messaging app on your phone.
- Receive Registration Message: You will get a SIM registration message from DITO.
- Tap the Registration Link: Click on the link provided in the message.
- Access the Registration Form: The link will redirect you to the DITO SIM registration form.
- Fill Out the Form: Complete the form with your correct personal information.
- Upload Required Photos: Upload a photo of your valid ID and a clear photo of yourself.
- Review and Submit: Check your details and submit the form.
- Confirmation: You will receive a confirmation message once your DITO SIM registration is successful.
DITO SIM Registration via Web Portal
To register your DITO SIM using the web portal, follow these steps:
- Click the DITO SIM registration link available on the DITO website.
- Enter your DITO SIM card number and verify it.
- Complete the required registration form with the following details:
- Your name
- Address
- Date of birth
- Email address
- Valid government ID
- Review the registration form and upload the necessary documents.
- You will receive a confirmation message from DITO indicating successful registration.
Dito sim registration link
For more information on mobile prefixes in the Philippines, check out our detailed guide on Mobile Prefix Numbers in the Philippines.
Requirements for DITO SIM Card Registration
The requirements for DITO SIM registration depend on your status—whether you are a Filipino citizen, a foreign minor, a business tourist, or a foreigner with a non-tourist visa. Here’s a list of what you will need:

Personal Information
- Full name
- Address
- Date of birth
- Gender
- Nationality
Government IDs (any of the following):
- Passport
- Driver’s License
- Unified Multi-Purpose ID (UMID)
- Social Security System (SSS) ID
- Philippine Identification (PhilID)
- Professional Regulation Commission (PRC) ID
- Voter’s ID
- Government Service Insurance System (GSIS) eCard
- Alien Certificate of Registration (ACR)
- Tax Identification Number (TIN) ID
- Company ID
- Student ID
- Security Guard License ID
- Senior Citizen ID
- Persons with Disabilities (PWD) ID
For Minors
- Personal information (name, address, date of birth, gender)
- Valid ID of the minor
- Valid ID of parents or guardians
- Consent from parents or guardians for registration
For Businesses
- Business information
- Special Power of Attorney (SPA)
- SEC or DTI registration
For Tourists
- Personal information
- Passport
- Duration of stay in the Philippines
- Address
For Foreigners with Non-Tourist Visas
- Personal details
- Copy of passport
- Visa information, including duration of stay
- ACR ID
- Clear photo
- Student ID (if applicable)
- Address in the Philippines
DITO SIM Card Registration Deadline
Understanding the Deadline
- DITO Telecommunity has established specific deadlines for both new and existing users to register their DITO SIM cards. This process is crucial to avoid service interruptions and ensure continued access to mobile features.
For Existing Users
- If you are an existing DITO user who has not yet registered your SIM card, it’s essential to act quickly. Failing to register by the deadline will result in deactivation of your SIM card, meaning you will lose all your call and messaging capabilities. In addition, you risk losing any data stored on your SIM. To prevent these issues, make sure to register your DITO SIM card as soon as possible. This will not only maintain your mobile services but also ensure you can continue to communicate without interruption.
For New Users
- For new users of DITO, the process begins when you insert your DITO SIM card into your phone. It’s important to register your SIM card immediately after activation. New users typically have a short grace period, usually ranging from 24 to 48 hours, to complete this registration. Missing this window may result in a complete halt of your services. Therefore, prompt registration is advisable to take full advantage of DITO’s offerings.
Rewards After Registration
Exciting Bonuses
- After registering your DITO SIM card, you’ll be eligible for several rewards, including data bundles and attractive bonuses to improve your mobile experience.
2GB Bonus Data
- As a new user, you’ll receive 2GB of bonus data after registering your DITO SIM. This bonus is perfect for browsing, streaming, and staying connected on social media. Note that the bonus is available for a limited time, so be sure to use it before it expires.
Loyalty Rewards
- DITO also offers a loyalty rewards program, allowing users to earn points through various activities. By registering, purchasing DITO SIM promos, and regularly using DITO services, you’ll accumulate points. These points can be redeemed for rewards like call packages, SMS bundles, and discounts. Plus, as a DITO SIM user, you’ll receive exclusive promotional offers to enhance your mobile experience.
DITO Compatible Phones
Enhance Your Experience
To enjoy the best possible service with DITO, it’s recommended to use a compatible phone that supports both 4G and 5G networks. Below is a list of brands and models that are known to work well with DITO’s services:
| Brand | Brand |
|---|---|
| Samsung | Huawei |
| Oppo | Vivo |
| OnePlus | Apple |
| Xiaomi | Realme |
| Itel | Infinix |
| Poco | TCL |
| ZTE | Nubia |
Tips for Non-Compatible Phones
If your current phone is not compatible with DITO’s network, you may not be able to take full advantage of their services, such as high-speed internet and call quality. Here are some actions you can take to enhance compatibility:
- Settings Adjustment: Go to the settings on your phone.
- Mobile Network: Click on the mobile network option and search for the Access Point Name (APN).
- APN Addition: Add the APN name internet.dito.ph and select it.
- Restart Your Device: Restart your phone to ensure that the changes take effect.
Following these steps may help improve your experience with DITO services.
Why is SIM Card Registration with DITO Important?
Benefits of Registration
- Registering your DITO SIM card is not just a regulatory requirement; it also comes with numerous benefits, enhancing your overall experience while using the service.
Compliance with Regulations
- SIM card registration is mandated by law in various countries, including the Philippines. This requirement ensures that mobile users are appropriately verified, contributing to greater transparency and accountability in mobile communications. By registering your DITO SIM, you comply with government regulations, which aim to foster a safer telecommunications environment.
Enhanced Security
- Another critical advantage of registering your DITO SIM card is the enhanced security it provides. Registration helps to reduce fraudulent activities, such as spam calls, identity theft, and SIM swapping. When your SIM card is linked to your personal details, it becomes significantly harder for malicious actors to misuse your SIM for illegal activities.
Improved Service Delivery
- Registered users of DITO enjoy many tailored services that match their specific needs. The company offers promotions based on your data usage and other preferences. If you experience any disturbances in your network service, registering your SIM enables DITO to take necessary measures to improve service quality, coverage, and data speeds.
Easier Recovery of Lost SIM
- Losing your DITO SIM card can be a frustrating experience, but having it registered makes the recovery process much simpler. DITO can verify your identity and the information you provided during the registration process, which allows you to recover your phone number and restore your services with minimal hassle.
Common Issues and Solutions
Addressing Common Challenges During DITO SIM Registration
While registering your DITO SIM card, you may face some challenges, including incorrect information, poor-quality document uploads, technical issues, network compatibility problems, and missed deadlines. Here’s how you can resolve these issues:
1. Incorrect Information
Entering inaccurate details like name, address, or birthdate can cause registration rejection. Always verify the information you provide on the form and ensure it matches your government-issued ID. If you find any errors after submission, contact DITO customer support for assistance.
2. Poor Quality Document Upload
Your registration might be rejected if the documents or selfie you upload are unclear or of low resolution. Ensure you upload high-quality, clear images that meet DITO’s guidelines to avoid delays or rejections.
3. Technical Glitches
Technical issues, such as app or website errors, can interfere with the registration process. To avoid this, ensure a stable internet connection while completing the registration. If you face glitches, wait for a moment and then try again.
4. Network Compatibility
If your phone isn’t compatible with the DITO network, you may experience service issues. Double-check the compatibility of your device with the DITO network to avoid service disruptions.
5. Missing Deadlines
If you miss the SIM registration deadline, your DITO SIM will be deactivated, causing a loss of services. If this happens, contact DITO customer support for help with reactivating your SIM card.
Importance of Meeting the SIM Registration Deadline
Why Timeliness Matters
- Meeting the registration deadline for your DITO SIM card is crucial for uninterrupted services. Here are some reasons why timely registration is essential:
Avoiding Service Interruptions
- If you miss the registration deadline, your SIM card will be deactivated. This means you will not be able to make calls, send messages, or access data services. Such interruptions can significantly impact your daily communication and connectivity.
Legal Compliance
- The SIM registration process is a legal requirement established by the Philippine government to enhance privacy and accountability in telecommunications. Failing to register your SIM by the deadline can lead to penalties and fines, adding unnecessary complications to your mobile experience.
Preventing Fraud
- The DITO SIM registration process helps to minimize fraudulent activities, including scams and spam. By linking your SIM to your personal information, you help prevent misuse and enhance your security.
Freebies After DITO Registration
Enjoy Rewards
After successfully registering your DITO SIM, you will be entitled to various freebies and rewards offered by DITO Telecommunity.
2GB Bonus Data
- Upon registration, users will receive 2GB of bonus data. This data can be utilized for a variety of online activities, including browsing, streaming, and connecting on social media. Remember, the 2GB bonus is limited, so be sure to use it before it expires.
Loyalty Reward Points
- As a registered DITO SIM user, you can accumulate loyalty reward points. These points can be earned through various activities, such as reloading your account, subscribing to services, and regularly using DITO’s offerings. The points can then be redeemed for rewards, including discounts, call packages, and more.
DITO 4G & 5G Compatible Devices
Optimal Device Performance
To make the most out of DITO’s data services, having a compatible device is essential. Here’s a breakdown of devices that work well with DITO:
4G-Compatible Phones
These brands and models are known to work seamlessly with DITO’s 4G network:
- Samsung
- Huawei
- Vivo
- Oppo
- Xiaomi
- Realme
- Itel
- TCL
- Cherry Mobile
- Infinix
- ZTE
5G-Compatible Devices
For those looking to take advantage of 5G networks, the following devices are compatible:
- Realme
- Xiaomi
- Oppo
- Vivo
- Tecno
- Samsung
- ZTE
- Narzo
Tips and Tricks for a Smooth DITO SIM Registration Process
Registering your DITO SIM card is an essential step to enjoy uninterrupted services. Here are some useful tips and tricks to ensure a smooth and hassle-free registration process.
1. Ensure Accurate Information
Accuracy is crucial when filling out your DITO SIM registration form. Before submitting your details, double-check the following:
- Full Name: Ensure that your name matches exactly as it appears on your government-issued ID.
- Address: Provide your complete residential address without any errors.
- Contact Information: Use a valid phone number that you currently own.
- Date of Birth: Enter your birthdate accurately.
- Government ID: Make sure that the ID you provide is valid and aligns with the information submitted.
Incorrect information can lead to delays or cancellation of your registration. Always take your time to verify every detail.
2. Use High-Quality Images
When asked to upload photos during the registration process, make sure they meet DITO’s requirements:
- Clarity: Your images should be clear and high-resolution.
- Free of Shadows: Ensure that there are no shadows obscuring any part of the image.
- Readable IDs: All text on your government ID must be easily readable.
Following these guidelines will help avoid issues related to image quality, which can impede your registration.
3. Stay Updated
The registration requirements may change. To avoid any last-minute surprises, regularly check DITO’s official website for updates on:
- Required Documents: Ensure you have the most recent information about the documents needed for registration.
- Registration Deadlines: Be aware of any upcoming deadlines that may affect your registration process.
Keeping yourself updated can help you save time and effort.
4. Contact Support
If you encounter problems during the registration process, don’t hesitate to reach out to DITO’s customer support. They can assist you with:
- Technical Issues: Help troubleshoot any problems you face while registering.
- Correcting Mistakes: Guide you on how to rectify any errors in your submitted information.
- Answering Questions: Clarify any doubts you have about the registration process.
You can contact DITO customer support via email, phone calls, or their social media platforms, depending on what is most convenient for you.
5. Monitor Deadlines
Missing the SIM registration deadline can lead to your SIM card being deactivated. To avoid this, set reminders for important dates related to your DITO SIM registration. Consider the following strategies:
- Calendar Reminders: Use your phone or computer calendar to set reminders about registration deadlines.
- Alarms: Set alarms on your phone to remind you a few days before the registration deadline.
By staying organized, you can ensure that you complete your registration on time.
Read More:
FAQs
What should I do if my DITO SIM card registration process is not working?
If you experience issues during the DITO SIM registration process, try the following:
- Check Your Internet Connection: Ensure that you have a stable internet connection.
- Review Your Information: Go through the details you’ve entered to ensure everything is correct.
- Try Different Methods: If one method fails, try registering through another option such as the portal, app, or SMS.
Can I register my DITO SIM card online?
Yes, you can easily register your DITO SIM card online. Simply visit the DITO official website or use the DITO registration app to complete the process.
How much time does the DITO SIM card registration process take?
Typically, the DITO SIM card registration process takes just a few minutes. However, if there are discrepancies in the information you provided, it may take longer to resolve those issues.
Is it safe to share my personal information during the SIM registration process?
Yes, it is generally safe to share your personal information during the SIM registration process. DITO prioritizes the security and privacy of user data, employing measures to protect your information.
What documents are required for DITO SIM registration?
To register your DITO SIM card, you will need the following documents:
- Government-issued ID: Acceptable forms include:
- Philippine Passport
- Driver’s License
- Voter’s ID
- Senior Citizen ID
- Selfie: A clear photo of yourself.
- Proof of Address: Documents confirming your residential address may also be required.
Ensure that all documents are valid and up to date.
How can I register my DITO number?
You can register your DITO number using one of the following methods:
- Official Website: Visit the DITO registration portal.
- DITO Registration App: Download the app on your smartphone.
- Link Method via SMS: Follow instructions provided in SMS communications from DITO.
How do I load my DITO SIM card?
You can load your DITO SIM card through several methods:
- DITO App: Use the app to load funds directly.
- Online Banking: Many banks allow you to add credits online.
- Retail Stores: Visit authorized retailers to purchase load.
Can I use a DITO SIM?
Yes, you can use a DITO SIM once you have successfully registered it with accurate personal information.
How to get OTP for DITO SIM Registration?
To receive a One-Time Password (OTP) during DITO SIM registration:
- Enter your DITO SIM card number.
- DITO will send you an OTP via SMS.
- Enter the OTP in the provided field to proceed with your registration.
What is the link for DITO SIM registration?
The registration link for DITO SIM is: register.dito.ph. Click this link to be redirected to the DITO official registration portal.
How long does DITO SIM registration take?
The registration process usually takes a few minutes. However, if you encounter any issues, it may require additional time for resolution.
How to upload a selfie during DITO SIM registration?
During the registration process:
- Provide the required documents, including your ID.
- Take a clear selfie using your phone camera.
- Confirm the image upload, and complete the registration.
How to check SIM registration status with DITO?
To check the status of your SIM registration:
- Open the DITO app.
- Navigate to the registration section.
- Look for any notifications or your registration status.
How do I register my DITO SIM number?
You can register your DITO SIM number using three different methods:
- Web Portal: Access the registration page online.
- SMS Link Method: Use the link sent via SMS for quick registration.
- DITO App: Download the app and register directly.
How to activate your DITO SIM?
To activate your DITO SIM card, follow these steps:
- Insert the SIM into your phone and power it on.
- Go to the settings menu.
- Select “Access Point Names” (APN).
- Click on “Add” and enter the following: internet.dito.ph.
How can I check if my SIM is already registered?
To check if your DITO SIM is already registered, you can:
- Open the DITO app and navigate to the SIM registration status section.
- Use the SMS service to inquire about your registration status.
- Visit a DITO retail store or contact customer support for assistance.
Is DITO under Globe or Smart?
DITO Telecommunity is an independent telecommunications network in the Philippines. It does not operate under either Globe or Smart, making it a distinct service provider.
Does DITO data expire?
Yes, DITO data does expire. The expiration depends on the validity of the bundle you purchase. Always check the terms associated with your data package for specific expiration details.